
Groovy 中的设计模式
在 Java 中使用设计模式是一个成熟的话题。设计模式也适用于 Groovy
-
有些模式可以直接沿用(并且可以利用 Groovy 正常的语法改进来提高可读性)
-
有些模式不再需要,因为它们已内置在语言中,或者 Groovy 支持更好的方式来实现模式的意图
-
在其他语言中必须在设计层面表达的一些模式可以直接在 Groovy 中实现(因为 Groovy 可以模糊设计和实现之间的界限)
1. 模式
1.1. 抽象工厂模式
抽象工厂模式提供了一种封装具有共同主题的独立工厂组的方法。它体现了普通工厂的意图,即消除使用接口的代码需要了解接口背后具体实现的需求,但它适用于一组接口并选择实现这些接口的整个具体类族。
例如,我可能有 Button、TextField 和 Scrollbar 接口。我可能有 WindowsButton、MacButton、FlashButton 作为 Button 的具体类。我可能有 WindowsScrollBar、MacScrollBar 和 FlashScrollBar 作为 ScrollBar 的具体实现。使用抽象工厂模式应该允许我一次选择要使用的窗口系统(即 Windows、Mac、Flash),然后就可以编写引用接口的代码,但实际上始终使用适当的具体类(都来自同一个窗口系统)。
1.1.1. 示例
假设我们想编写一个游戏系统。我们可能会注意到许多游戏具有非常相似的功能和控制。
我们决定尝试将通用代码和游戏特定代码拆分到不同的类中。
首先让我们看看 Two-up 游戏的特定于游戏的代码
class TwoupMessages {
    def welcome = 'Welcome to the twoup game, you start with $1000'
    def done = 'Sorry, you have no money left, goodbye'
}

class TwoupInputConverter {
    def convert(input) { input.toInteger() }
}

class TwoupControl {
    private money = 1000
    private random = new Random()
    private tossWasHead() {
        def next = random.nextInt()
        return next % 2 == 0
    }
    def moreTurns() {
        if (money > 0) {
            println "You have $money, how much would you like to bet?"
            return true
        }

        false
    }
    def play(amount) {
        def coin1 = tossWasHead()
        def coin2 = tossWasHead()
        if (coin1 && coin2) {
            money += amount
            println 'You win'
        } else if (!coin1 && !coin2) {
            money -= amount
            println 'You lose'
        } else {
            println 'Draw'
        }
    }
}
现在,让我们看看数字猜谜游戏的特定于游戏的代码
class GuessGameMessages {
    def welcome = 'Welcome to the guessing game, my secret number is between 1 and 100'
    def done = 'Correct'
}

class GuessGameInputConverter {
    def convert(input) { input.toInteger() }
}

class GuessGameControl {
    private lower = 1
    private upper = 100
    private guess = new Random().nextInt(upper - lower) + lower
    def moreTurns() {
        def done = (lower == guess || upper == guess)
        if (!done) {
            println "Enter a number between $lower and $upper"
        }

        !done
    }
    def play(nextGuess) {
        if (nextGuess <= guess) {
            lower = [lower, nextGuess].max()
        }
        if (nextGuess >= guess) {
            upper = [upper, nextGuess].min()
        }
    }
}
现在,让我们编写工厂代码
def guessFactory = [messages: GuessGameMessages, control: GuessGameControl, converter: GuessGameInputConverter]
def twoupFactory = [messages: TwoupMessages, control: TwoupControl, converter: TwoupInputConverter]

class GameFactory {
    def static factory
    def static getMessages() { return factory.messages.newInstance() }
    def static getControl() { return factory.control.newInstance() }
    def static getConverter() { return factory.converter.newInstance() }
}
这个工厂的重要方面是它允许选择整个具体类族。
以下是我们如何使用工厂
GameFactory.factory = twoupFactory
def messages = GameFactory.messages
def control = GameFactory.control
def converter = GameFactory.converter
println messages.welcome
def reader = new BufferedReader(new InputStreamReader(System.in))
while (control.moreTurns()) {
    def input = reader.readLine().trim()
    control.play(converter.convert(input))
}
println messages.done
请注意,第一行配置了我们将使用的具体游戏类族。通过使用工厂属性(如第一行所示)选择要使用的族并不重要。其他方式同样是该模式的有效示例。例如,我们可能询问用户他们想玩什么游戏,或者从环境设置中确定哪个游戏。
使用所示代码,游戏运行时可能如下所示
Welcome to the twoup game, you start with $1000
You have 1000, how much would you like to bet?
300
Draw
You have 1000, how much would you like to bet?
700
You win
You have 1700, how much would you like to bet?
1700
You lose
Sorry, you have no money left, goodbye
如果我们将脚本的第一行更改为 GameFactory.factory = guessFactory,则示例运行可能如下所示
Welcome to the guessing game, my secret number is between 1 and 100
Enter a number between 1 and 100
75
Enter a number between 1 and 75
35
Enter a number between 1 and 35
15
Enter a number between 1 and 15
5
Enter a number between 5 and 15
10
Correct
1.2. 适配器模式
适配器模式(有时称为包装器模式)允许将满足一个接口的对象用于期望另一种接口类型的地方。该模式有两种典型的风格:委托风格和继承风格。
1.2.1. 委托示例
假设我们有以下类
class SquarePeg {
    def width
}

class RoundPeg {
    def radius
}

class RoundHole {
    def radius
    def pegFits(peg) {
        peg.radius <= radius
    }
    String toString() { "RoundHole with radius $radius" }
}
我们可以询问 RoundHole 类一个 RoundPeg 是否适合它,但是如果我们对 SquarePeg 提出同样的问题,那么它将失败,因为 SquarePeg 类没有 radius 属性(即不满足所需的接口)。
为了解决这个问题,我们可以创建一个适配器,使其看起来具有正确的接口。它看起来像这样
class SquarePegAdapter {
    def peg
    def getRadius() {
        Math.sqrt(((peg.width / 2) ** 2) * 2)
    }
    String toString() {
        "SquarePegAdapter with peg width $peg.width (and notional radius $radius)"
    }
}
我们可以这样使用适配器
def hole = new RoundHole(radius: 4.0)
(4..7).each { w ->
    def peg = new SquarePegAdapter(peg: new SquarePeg(width: w))
    if (hole.pegFits(peg)) {
        println "peg $peg fits in hole $hole"
    } else {
        println "peg $peg does not fit in hole $hole"
    }
}
这会产生以下输出
peg SquarePegAdapter with peg width 4 (and notional radius 2.8284271247461903) fits in hole RoundHole with radius 4.0
peg SquarePegAdapter with peg width 5 (and notional radius 3.5355339059327378) fits in hole RoundHole with radius 4.0
peg SquarePegAdapter with peg width 6 (and notional radius 4.242640687119285) does not fit in hole RoundHole with radius 4.0
peg SquarePegAdapter with peg width 7 (and notional radius 4.949747468305833) does not fit in hole RoundHole with radius 4.0
1.2.2. 继承示例
让我们再次考虑相同的示例,使用继承。首先,这是原始类(未更改)
class SquarePeg {
    def width
}

class RoundPeg {
    def radius
}

class RoundHole {
    def radius
    def pegFits(peg) {
        peg.radius <= radius
    }
    String toString() { "RoundHole with radius $radius" }
}
一个使用继承的适配器
class SquarePegAdapter extends SquarePeg {
    def getRadius() {
        Math.sqrt(((width / 2) ** 2) * 2)
    }
    String toString() {
        "SquarePegAdapter with width $width (and notional radius $radius)"
    }
}
使用适配器
def hole = new RoundHole(radius: 4.0)
(4..7).each { w ->
    def peg = new SquarePegAdapter(width: w)
    if (hole.pegFits(peg)) {
        println "peg $peg fits in hole $hole"
    } else {
        println "peg $peg does not fit in hole $hole"
    }
}
输出
peg SquarePegAdapter with width 4 (and notional radius 2.8284271247461903) fits in hole RoundHole with radius 4.0
peg SquarePegAdapter with width 5 (and notional radius 3.5355339059327378) fits in hole RoundHole with radius 4.0
peg SquarePegAdapter with width 6 (and notional radius 4.242640687119285) does not fit in hole RoundHole with radius 4.0
peg SquarePegAdapter with width 7 (and notional radius 4.949747468305833) does not fit in hole RoundHole with radius 4.0
1.2.3. 使用闭包进行适配
作为前面示例的变体,我们可以定义以下接口
interface RoundThing {
    def getRadius()
}
然后我们可以将适配器定义为一个闭包,如下所示
def adapter = {
    p -> [getRadius: { Math.sqrt(((p.width / 2) ** 2) * 2) }] as RoundThing
}
并这样使用它
def peg = new SquarePeg(width: 4)
if (hole.pegFits(adapter(peg))) {
    // ... as before
}
1.2.4. 使用 ExpandoMetaClass 进行适配
从 Groovy 1.1 开始,有一个内置的 MetaClass 可以自动动态添加属性和方法。
以下是使用该功能时的示例
def peg = new SquarePeg(width: 4)
peg.metaClass.radius = Math.sqrt(((peg.width / 2) ** 2) * 2)
创建 peg 对象后,您可以简单地即时为其添加属性。无需更改原始类,也无需适配器类。
1.3. 守卫模式
守卫模式描述了一种方法的用法,该方法的唯一目的是抛出异常(当特定条件成立时)或什么都不做。此类方法通常用于防御性地保护方法的先决条件。
编写实用方法时,应始终防范错误的输入参数。编写内部方法时,您可以通过设置足够的单元测试来确保某些先决条件始终成立。在这种情况下,您可以降低在方法上设置守卫的必要性。
Groovy 与其他语言不同之处在于,您经常在方法中直接使用 assert 方法,而不是拥有大量实用检查器方法或类。
1.3.1. 空值检查示例
我们可能有一个实用方法,例如
class NullChecker {
    static check(name, arg) {
        if (arg == null) {
            throw new IllegalArgumentException(name + ' is null')
        }
    }
}
我们这样使用它
void doStuff(String name, Object value) {
    NullChecker.check('name', name)
    NullChecker.check('value', value)
    // do stuff
}
但更 Groovy 的做法是这样
void doStuff(String name, Object value) {
    assert name != null, 'name should not be null'
    assert value != null, 'value should not be null'
    // do stuff
}
1.3.2. 验证示例
作为替代示例,我们可能有这个实用方法
class NumberChecker {
    static final String NUMBER_PATTERN = "\\\\d+(\\\\.\\\\d+(E-?\\\\d+)?)?"
    static isNumber(str) {
        if (!str ==~ NUMBER_PATTERN) {
            throw new IllegalArgumentException("Argument '$str' must be a number")
        }
    }
    static isNotZero(number) {
        if (number == 0) {
            throw new IllegalArgumentException('Argument must not be 0')
        }
    }
}
我们这样使用它
def stringDivide(String dividendStr, String divisorStr) {
    NumberChecker.isNumber(dividendStr)
    NumberChecker.isNumber(divisorStr)
    def dividend = dividendStr.toDouble()
    def divisor = divisorStr.toDouble()
    NumberChecker.isNotZero(divisor)
    dividend / divisor
}

println stringDivide('1.2E2', '3.0')
// => 40.0
但在 Groovy 中,我们可以同样轻松地使用
def stringDivide(String dividendStr, String divisorStr) {
    assert dividendStr =~ NumberChecker.NUMBER_PATTERN
    assert divisorStr =~ NumberChecker.NUMBER_PATTERN
    def dividend = dividendStr.toDouble()
    def divisor = divisorStr.toDouble()
    assert divisor != 0, 'Divisor must not be 0'
    dividend / divisor
}
1.4. 责任链模式
在责任链模式中,使用和实现接口(一个或多个方法)的对象是故意松散耦合的。一组实现接口的对象被组织在一个列表(或在极少数情况下是树)中。使用接口的对象向第一个实现者对象发出请求。它将决定是自己执行任何操作,还是将请求进一步传递到列表(或树)中。有时,如果没有任何实现者响应请求,还会将某些请求的默认实现编码到模式中。
1.4.1. 使用传统类的示例
在此示例中,脚本向 lister 对象发送请求。lister 指向 UnixLister 对象。如果它无法处理请求,它会将请求发送到 WindowsLister。如果它无法处理请求,它会将请求发送到 DefaultLister。
class UnixLister {
    private nextInLine
    UnixLister(next) { nextInLine = next }
    def listFiles(dir) {
        if (System.getProperty('os.name') == 'Linux') {
            println "ls $dir".execute().text
        } else {
            nextInLine.listFiles(dir)
        }
    }
}

class WindowsLister {
    private nextInLine
    WindowsLister(next) { nextInLine = next }
    def listFiles(dir) {
        if (System.getProperty('os.name').startsWith('Windows')) {
            println "cmd.exe /c dir $dir".execute().text
        } else {
            nextInLine.listFiles(dir)
        }
    }
}

class DefaultLister {
    def listFiles(dir) {
        new File(dir).eachFile { f -> println f }
    }
}

def lister = new UnixLister(new WindowsLister(new DefaultLister()))

lister.listFiles('Downloads')
输出将是文件列表(格式略有不同,取决于操作系统)。
这是 UML 表示
1.4.2. 使用简化策略的示例
对于简单情况,考虑通过不要求类链来简化代码。相反,使用 Groovy 真值和 Elvis 运算符,如下所示
String unixListFiles(dir) {
    if (System.getProperty('os.name') == 'Linux') {
        "ls $dir".execute().text
    }
}

String windowsListFiles(dir) {
    if (System.getProperty('os.name').startsWith('Windows')) {
        "cmd.exe /c dir $dir".execute().text
    }
}

String defaultListFiles(dir) {
    new File(dir).listFiles().collect{ f -> f.name }.join('\\n')
}

def dir = 'Downloads'
println unixListFiles(dir) ?: windowsListFiles(dir) ?: defaultListFiles(dir)
或 Groovy 的 switch,如下所示
String listFiles(dir) {
    switch(dir) {
    case { System.getProperty('os.name') == 'Linux' }:
        return "ls $dir".execute().text
    case { System.getProperty('os.name').startsWith('Windows') }:
        return "cmd.exe /c dir $dir".execute().text
    default:
        new File(dir).listFiles().collect{ f -> f.name }.join('\\n')
    }
}

println listFiles('Downloads')
或者,对于 Groovy 3+,考虑使用 lambda 流,如下所示
Optional<String> unixListFiles(String dir) {
    Optional.ofNullable(dir)
        .filter(d -> System.getProperty('os.name') == 'Linux')
        .map(d -> "ls $d".execute().text)
}

Optional<String> windowsListFiles(String dir) {
    Optional.ofNullable(dir)
        .filter(d -> System.getProperty('os.name').startsWith('Windows'))
        .map(d -> "cmd.exe /c dir $d".execute().text)
}

Optional<String> defaultListFiles(String dir) {
    Optional.ofNullable(dir)
        .map(d -> new File(d).listFiles().collect{ f -> f.name }.join('\\n'))
}

def dir = 'Downloads'
def handlers = [this::unixListFiles, this::windowsListFiles, this::defaultListFiles]
println handlers.stream()
    .map(f -> f(dir))
    .filter(Optional::isPresent)
    .map(Optional::get)
    .findFirst()
    .get()
1.4.3. 何时不使用
如果您的责任链使用频繁涉及 instanceof 运算符,例如这里
import static Math.PI as π
abstract class Shape {
    String name
}
class Polygon extends Shape {
    String name
    double lengthSide
    int numSides
}
class Circle extends Shape {
    double radius
}

class CircleAreaCalculator {
    def next
    def area(shape) {
        if (shape instanceof Circle) {            (1)
            return shape.radius ** 2 * π
        } else {
            next.area(shape)
        }
    }
}
class SquareAreaCalculator {
    def next
    def area(shape) {
        if (shape instanceof Polygon && shape.numSides == 4) {      (1)
            return shape.lengthSide ** 2
        } else {
            next.area(shape)
        }
    }
}
class DefaultAreaCalculator {
    def area(shape) {
        throw new IllegalArgumentException("Don't know how to calculate area for $shape")
    }
}

def chain = new CircleAreaCalculator(next: new SquareAreaCalculator(next: new DefaultAreaCalculator()))
def shapes = [
    new Circle(name: 'Circle', radius: 5.0),
    new Polygon(name: 'Square', lengthSide: 10.0, numSides: 4)
]
shapes.each { println chain.area(it) }| 1 | instanceof 代码异味 |
它可能表明,与其使用责任链模式,不如考虑使用更丰富的类型,或许结合 Groovy 的多方法。例如,也许这样
// ...
class Square extends Polygon {
    // ...
}

double area(Circle c) {
    c.radius ** 2 * π
}

double area(Square s) {
    s.lengthSide ** 2
}

def shapes = [
    new Circle(radius: 5.0),
    new Square(lengthSide: 10.0, numSides: 4)
]
shapes.each { println area(it) }
或者使用更传统的面向对象风格,例如这样
import static Math.PI as π
interface Shape {
    double area()
}
abstract class Polygon implements Shape {
    double lengthSide
    int numSides
    abstract double area()
}
class Circle implements Shape {
    double radius
    double area() {
        radius ** 2 * π
    }
}
class Square extends Polygon {
    // ...
    double area() {
        lengthSide ** 2
    }
}

def shapes = [
    new Circle(radius: 5.0),
    new Square(lengthSide: 10.0, numSides: 4)
]
shapes.each { println it.area() }
1.4.4. 深入探讨
该模式的其他变体
-
我们可以在传统示例中有一个显式接口,例如
Lister,来静态类型化实现,但由于鸭子类型,这是可选的 -
我们可以使用链树而不是列表,例如
if (animal.hasBackbone())委托给VertebrateHandler否则委托给InvertebrateHandler -
即使我们处理了请求,我们也可以始终沿着链传递(没有提前返回)
-
我们可以在某个时候决定不响应并且不沿着链传递(抢占式中止)
-
我们可以使用 Groovy 的元编程能力将未知方法沿着链传递,例如将责任链与
methodMissing的使用相结合
1.5. 命令模式
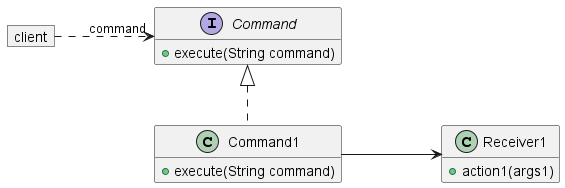
命令模式是一种模式,用于松散耦合希望执行一系列命令的客户端对象和执行这些命令的接收器对象。客户端不直接与接收器对话,而是与中间对象交互,然后中间对象将必要的命令中继到接收器。该模式在 JDK 中普遍使用,例如 Swing 中的 api:javax.swing.Action[] 类将 Swing 代码与按钮、菜单项和面板等接收器解耦。
显示典型类的类图是
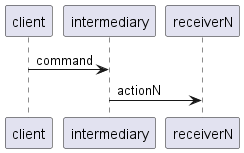
对于任意接收器,交互序列如下所示
1.5.1. 使用传统类的示例
打开和关闭灯所需的 relevante 类(参见早期维基百科参考中的示例)如下所示
interface Command {
    void execute()
}

// invoker class
class Switch {
    private final Map<String, Command> commandMap = new HashMap<>()

    void register(String commandName, Command command) {
        commandMap[commandName] = command
    }

    void execute(String commandName) {
        Command command = commandMap[commandName]
        if (!command) {
            throw new IllegalStateException("no command registered for " + commandName)
        }
        command.execute()
    }
}

// receiver class
class Light {
    void turnOn() {
        println "The light is on"
    }

    void turnOff() {
        println "The light is off"
    }
}

class SwitchOnCommand implements Command {
    Light light

    @Override // Command
    void execute() {
        light.turnOn()
    }
}

class SwitchOffCommand implements Command {
    Light light

    @Override // Command
    void execute() {
        light.turnOff()
    }
}

Light lamp = new Light()
Command switchOn = new SwitchOnCommand(light: lamp)
Command switchOff = new SwitchOffCommand(light: lamp)

Switch mySwitch = new Switch()
mySwitch.register("on", switchOn)
mySwitch.register("off", switchOff)

mySwitch.execute("on")
mySwitch.execute("off")
我们的客户端脚本向中间对象发送 execute 命令,并且对任何特定接收器或任何特定操作方法名称和参数一无所知。
1.5.2. 简化变体
鉴于 Groovy 具有一流函数支持,我们可以通过使用闭包来取代实际的命令类(例如 SwitchOnCommand),如下所示
interface Command {
    void execute()
}

// invoker class
class Switch {
    private final Map<String, Command> commandMap = [:]

    void register(String commandName, Command command) {
        commandMap[commandName] = command
    }

    void execute(String commandName) {
        Command command = commandMap[commandName]
        if (!command) {
            throw new IllegalStateException("no command registered for $commandName")
        }
        command.execute()
    }
}

// receiver class
class Light {
    void turnOn() {
        println 'The light is on'
    }

    void turnOff() {
        println 'The light is off'
    }
}

Light lamp = new Light()

Switch mySwitch = new Switch()
mySwitch.register("on", lamp.&turnOn)       (1)
mySwitch.register("off", lamp.&turnOff)     (1)

mySwitch.execute("on")
mySwitch.execute("off")| 1 | 命令闭包(此处为方法闭包),但对于 Groovy 3+ 可以是 lambdas/方法引用 |
我们可以通过使用 JDK 现有的 Runnable 接口和使用 switch map 而不是单独的 Switch 类来进一步简化,如下所示
class Light {
    void turnOn() {
        println 'The light is on'
    }

    void turnOff() {
        println 'The light is off'
    }
}

class Door {
    static void unlock() {
        println 'The door is unlocked'
    }
}

Light lamp = new Light()
Map<String, Runnable> mySwitch = [
    on: lamp::turnOn,
    off: lamp::turnOff,
    unlock: Door::unlock
]

mySwitch.on()
mySwitch.off()
mySwitch.unlock()
我们添加了一个额外的 Door 接收器,以说明如何扩展原始示例。运行此脚本将产生
The light is on
The light is off
The door is unlocked
作为一种变体,如果命令名称对我们不重要,我们可以放弃使用 switch map,而只保留一个要调用的任务列表,如下所示
// ...
List<Runnable> tasks = [lamp::turnOn, lamp::turnOff, Door::unlock]
tasks.each{ it.run() }
1.6. 组合模式
组合模式允许您以与一组对象相同的方式处理对象的单个实例。该模式通常与对象层次结构一起使用。通常,一个或多个方法应以相同的方式用于层次结构中的叶节点或组合节点。在这种情况下,组合节点通常为其每个子节点调用同名方法。
1.6.1. 示例
考虑这种组合模式的用法,我们希望在 Leaf 或 Composite 对象上调用 toString()。
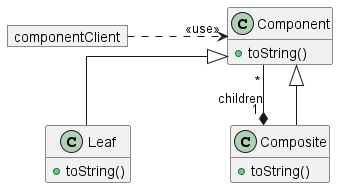
在 Java 中,Component 类至关重要,因为它提供了用于叶节点和组合节点的类型。在 Groovy 中,由于鸭子类型,我们不需要它用于该目的,但是,它仍然可以作为一个有用的地方来放置叶节点和组合节点之间的共同行为。
为了我们的目的,我们将组装以下组件层次结构。

这是代码
abstract class Component {
    def name
    def toString(indent) {
        ("-" * indent) + name
    }
}

class Composite extends Component {
    private children = []
    def toString(indent) {
        def s = super.toString(indent)
        children.each { child ->
            s += "\\n" + child.toString(indent + 1)
        }
        s
    }
    def leftShift(component) {
        children << component
    }
}

class Leaf extends Component { }

def root = new Composite(name: "root")
root << new Leaf(name: "leaf A")
def comp = new Composite(name: "comp B")
root << comp
root << new Leaf(name: "leaf C")
comp << new Leaf(name: "leaf B1")
comp << new Leaf(name: "leaf B2")
println root.toString(0)
这是结果输出
root
-leaf A
-comp B
--leaf B1
--leaf B2
-leaf C
1.7. 装饰器模式
装饰器模式提供了一种修饰对象行为的机制,而无需更改其基本接口。装饰对象应该能够代替原始(未装饰)对象出现的地方。装饰通常不涉及修改原始对象的源代码,并且装饰器应该能够以灵活的方式组合,以生成具有多种修饰的对象。
1.7.1. 传统示例
假设我们有以下 Logger 类。
class Logger {
    def log(String message) {
        println message
    }
}
有时,给日志消息加时间戳会很有用,或者我们可能想要更改消息的大小写。我们可以尝试将所有这些功能内置到我们的 Logger 类中。如果这样做,Logger 类将变得非常复杂。此外,每个人都会获得所有功能,即使他们可能只需要一小部分功能。最后,功能交互将变得非常难以控制。
为了克服这些缺点,我们转而定义了两个装饰器类。Logger 类的使用者可以根据自己的需要,以任何顺序,用零个或多个装饰器类来修饰其基本记录器。这些类看起来像这样
class TimeStampingLogger extends Logger {
    private Logger logger
    TimeStampingLogger(logger) {
        this.logger = logger
    }
    def log(String message) {
        def now = Calendar.instance
        logger.log("$now.time: $message")
    }
}

class UpperLogger extends Logger {
    private Logger logger
    UpperLogger(logger) {
        this.logger = logger
    }
    def log(String message) {
        logger.log(message.toUpperCase())
    }
}
我们可以这样使用装饰器
def logger = new UpperLogger(new TimeStampingLogger(new Logger()))
logger.log("G'day Mate")
// => Tue May 22 07:13:50 EST 2007: G'DAY MATE
您可以看到我们用两个装饰器都修饰了日志记录器行为。由于我们选择的装饰器应用顺序,我们的日志消息以大写形式输出,并且时间戳是正常大小写。如果我们交换顺序,让我们看看会发生什么
logger = new TimeStampingLogger(new UpperLogger(new Logger()))
logger.log('Hi There')
// => TUE MAY 22 07:13:50 EST 2007: HI THERE
现在时间戳本身也已更改为大写。
1.7.2. 使用闭包或 Lambda 表达式简化
闭包使代码表示变得容易。我们可以利用这个事实来创建一个接受装饰代码作为闭包的通用日志类。这为我们省去了定义许多装饰类的工作。
class DecoratingLogger {
    def decoration = Closure.IDENTITY

    def log(String message) {
        println decoration(message)
    }
}

def upper = { it.toUpperCase() }
def stamp = { "$Calendar.instance.time: $it" }
def logger = new DecoratingLogger(decoration: stamp << upper)
logger.log("G'day Mate")
// Sat Aug 29 15:28:29 AEST 2020: G'DAY MATE
我们可以使用相同的方法与 lambda 表达式
import java.util.function.Function

class DecoratingLogger {
    Function<String, String> decoration = Function.identity()

    def log(String message) {
        println decoration.apply(message)
    }
}

Function<String, String> upper = s -> s.toUpperCase()
Function<String, String> stamp = s -> "$Calendar.instance.time: $s"
def logger = new DecoratingLogger(decoration: upper.andThen(stamp))
logger.log("G'day Mate")
// => Sat Aug 29 15:38:28 AEST 2020: G'DAY MATE
1.7.3. 一点动态行为
我们之前的装饰器是针对 Logger 对象的。我们可以利用 Groovy 的元对象编程能力来创建一个通用得多的装饰器。考虑这个类
class GenericLowerDecorator {
    private delegate
    GenericLowerDecorator(delegate) {
        this.delegate = delegate
    }
    def invokeMethod(String name, args) {
        def newargs = args.collect { arg ->
            if (arg instanceof String) {
                return arg.toLowerCase()
            } else {
                return arg
            }
        }
        delegate.invokeMethod(name, newargs)
    }
}
它接受任何类并对其进行装饰,以便任何 String 方法参数都将自动转换为小写。
logger = new GenericLowerDecorator(new TimeStampingLogger(new Logger()))
logger.log('IMPORTANT Message')
// => Tue May 22 07:27:18 EST 2007: important message
这里要小心顺序。原始装饰器仅限于装饰 Logger 对象。这个装饰器适用于任何对象类型,因此我们不能交换顺序,也就是说,这不会起作用
// Can't mix and match Interface-Oriented and Generic decorators
// logger = new TimeStampingLogger(new GenericLowerDecorator(new Logger()))
我们可以通过在运行时生成适当的 Proxy 类型来克服这个限制,但这里我们不会使示例复杂化。
1.7.4. 运行时行为修饰
您还可以考虑使用 Groovy 1.1 中的 ExpandoMetaClass 来动态修饰类的行为。这并不是装饰器模式的正常使用方式(它肯定没有那么灵活),但在某些情况下可能有助于您在不创建新类的情况下实现类似的结果。
这是代码的样子
// current mechanism to enable ExpandoMetaClass
GroovySystem.metaClassRegistry.metaClassCreationHandle = new ExpandoMetaClassCreationHandle()

def logger = new Logger()
logger.metaClass.log = { String m -> println 'message: ' + m.toUpperCase() }
logger.log('x')
// => message: X
这实现了与应用单个装饰器类似的结果,但我们无法轻松地动态应用和移除修饰。
1.7.5. 更多动态装饰
假设我们有一个计算器类(实际上任何类都可以)。
class Calc {
    def add(a, b) { a + b }
}
我们可能对观察该类随时间的使用情况感兴趣。如果它深埋在我们的代码库中,可能很难确定何时被调用以及使用什么参数。此外,可能很难知道它是否表现良好。我们可以轻松地制作一个通用跟踪装饰器,它在调用 Calc 类的任何方法时打印出跟踪信息,并提供执行时间的计时信息。这是跟踪装饰器的代码
class TracingDecorator {
    private delegate
    TracingDecorator(delegate) {
        this.delegate = delegate
    }
    def invokeMethod(String name, args) {
        println "Calling $name$args"
        def before = System.currentTimeMillis()
        def result = delegate.invokeMethod(name, args)
        println "Got $result in ${System.currentTimeMillis()-before} ms"
        result
    }
}
这是在脚本中使用该类的方法
def tracedCalc = new TracingDecorator(new Calc())
assert 15 == tracedCalc.add(3, 12)
这是运行此脚本后您将看到的内容
Calling add{3, 12}
Got 15 in 31 ms
1.7.6. 使用拦截器进行装饰
上述计时示例通过 invokeMethod 钩入 Groovy 对象的生命周期。这是一种非常重要的元编程风格,Groovy 对这种使用拦截器的装饰风格有特殊支持。
Groovy 甚至带有一个内置的 TracingInterceptor。我们可以像这样扩展内置类
class TimingInterceptor extends TracingInterceptor {
    private beforeTime
    def beforeInvoke(object, String methodName, Object[] arguments) {
        super.beforeInvoke(object, methodName, arguments)
        beforeTime = System.currentTimeMillis()
    }
    Object afterInvoke(Object object, String methodName, Object[] arguments, Object result) {
        super.afterInvoke(object, methodName, arguments, result)
        def duration = System.currentTimeMillis() - beforeTime
        writer.write("Duration: $duration ms\\n")
        writer.flush()
        result
    }
}
这是一个使用这个新类的例子
def proxy = ProxyMetaClass.getInstance(Calc)
proxy.interceptor = new TimingInterceptor()
proxy.use {
    assert 7 == new Calc().add(1, 6)
}
输出结果是
before Calc.ctor()
after  Calc.ctor()
Duration: 0 ms
before Calc.add(java.lang.Integer, java.lang.Integer)
after  Calc.add(java.lang.Integer, java.lang.Integer)
Duration: 2 ms
1.7.7. 使用 java.lang.reflect.Proxy 进行装饰
如果您尝试装饰一个对象(即,只是该类的特定实例,而不是一般意义上的类),那么您可以使用 Java 的 java.lang.reflect.Proxy。Groovy 使其比纯 Java 更容易使用。下面是一个摘自 Grails 项目的代码示例,它包装了一个 java.sql.Connection,以便其 close 方法是一个无操作方法
protected Sql getGroovySql() {
    final Connection con = session.connection()
    def invoker = { object, method, args ->
        if (method.name == "close") {
            log.debug("ignoring call to Connection.close() for use by groovy.sql.Sql")
        } else {
            log.trace("delegating $method")
            return con.invokeMethod(method.name, args)
        }
    } as InvocationHandler;
    def proxy = Proxy.newProxyInstance( getClass().getClassLoader(), [Connection] as Class[], invoker )
    return new Sql(proxy)
}
如果有许多方法要拦截,则可以修改此方法,通过方法名称在 map 中查找闭包并调用它。
1.7.8. 使用 Spring 进行装饰
Spring Framework 允许使用拦截器(您可能听说过通知或切面)来应用装饰器。您也可以从 Groovy 中利用此机制。
首先定义一个您想要装饰的类(我们也将使用一个接口,这是 Spring 的正常做法)
这是接口
interface Calc {
    def add(a, b)
}
这是类
class CalcImpl implements Calc {
    def add(a, b) { a + b }
}
现在,我们定义我们的布线在名为 beans.xml 的文件中,如下所示
<?xml version="1.0" encoding="UTF-8"?>
<beans xmlns="http://www.springframework.org/schema/beans"
	xmlns:xsi="http://www.w3.org/2001/XMLSchema-instance"
	xmlns:lang="http://www.springframework.org/schema/lang"
	xsi:schemaLocation="
		http://www.springframework.org/schema/beans https://www.springframework.org/schema/beans/spring-beans.xsd
		http://www.springframework.org/schema/lang https://www.springframework.org/schema/lang/spring-lang.xsd">

    <bean id="performanceInterceptor" autowire="no"
          class="org.springframework.aop.interceptor.PerformanceMonitorInterceptor">
        <property name="loggerName" value="performance"/>
    </bean>
    <bean id="calc" class="util.CalcImpl"/>
    <bean class="org.springframework.aop.framework.autoproxy.BeanNameAutoProxyCreator">
        <property name="beanNames" value="calc"/>
        <property name="interceptorNames" value="performanceInterceptor"/>
    </bean>
</beans>
现在,我们的脚本看起来像这样
@Grab('org.springframework:spring-context:5.2.8.RELEASE')
import org.springframework.context.support.ClassPathXmlApplicationContext

def ctx = new ClassPathXmlApplicationContext('beans.xml')
def calc = ctx.getBean('calc')
println calc.add(3, 25)
当我们运行它时,我们会看到结果
21/05/2007 23:02:35 org.springframework.aop.interceptor.PerformanceMonitorInterceptor invokeUnderTrace
FINEST: StopWatch 'util.Calc.add': running time (millis) = 16
您可能需要调整 logging.properties 文件,以便显示 FINEST 日志级别的消息。
1.7.9. 使用 GPars 的异步装饰器
以下示例受到 Panini 编程语言早期示例代码的启发。如今,您会看到这种风格与 JavaScript 中的异步函数一起使用。
@Grab('org.codehaus.gpars:gpars:0.10')
import static groovyx.gpars.GParsPool.withPool

interface Document {
    void print()
    String getText()
}

class DocumentImpl implements Document {
    def document
    void print() { println document }
    String getText() { document }
}

def words(String text) {
    text.replaceAll('[^a-zA-Z]', ' ').trim().split("\\\\s+")*.toLowerCase()
}

def avgWordLength = {
    def words = words(it.text)
    sprintf "Avg Word Length: %4.2f", words*.size().sum() / words.size()
}
def modeWord = {
    def wordGroups = words(it.text).groupBy {it}.collectEntries { k, v -> [k, v.size()] }
    def maxSize = wordGroups*.value.max()
    def maxWords = wordGroups.findAll { it.value == maxSize }
    "Mode Word(s): ${maxWords*.key.join(', ')} ($maxSize occurrences)"
}
def wordCount = { d -> "Word Count: " + words(d.text).size() }

def asyncDecorator(Document d, Closure c) {
    ProxyGenerator.INSTANCE.instantiateDelegate([print: {
        withPool {
            def result = c.callAsync(d)
            d.print()
            println result.get()
        }
    }], [Document], d)
}

Document d = asyncDecorator(asyncDecorator(asyncDecorator(
        new DocumentImpl(document:"This is the file with the words in it\\n\\t\\nDo you see the words?\\n"),
//        new DocumentImpl(document: new File('AsyncDecorator.groovy').text),
        wordCount), modeWord), avgWordLength)
d.print()
1.8. 委托模式
委托模式是一种技术,其中对象的行为(公共方法)通过将责任委托给一个或多个关联对象来实现。
Groovy 允许以传统方式应用委托模式,例如,参见 用委托替换超类。
1.8.1. 使用 ExpandoMetaClass 实现委托模式
groovy.lang.ExpandoMetaClass 允许将此模式的使用封装在库中。这使得 Groovy 能够模拟 Ruby 语言中可用的类似库。
考虑以下库类
class Delegator {
    private targetClass
    private delegate
    Delegator(targetClass, delegate) {
        this.targetClass = targetClass
        this.delegate = delegate
    }
    def delegate(String methodName) {
        delegate(methodName, methodName)
    }
    def delegate(String methodName, String asMethodName) {
        targetClass.metaClass."$asMethodName" = delegate.&"$methodName"
    }
    def delegateAll(String[] names) {
        names.each { delegate(it) }
    }
    def delegateAll(Map names) {
        names.each { k, v -> delegate(k, v) }
    }
    def delegateAll() {
        delegate.class.methods*.name.each { delegate(it) }
    }
}
有了这个在您的 classpath 中,您现在可以动态地应用委托模式,如以下示例所示。首先,考虑我们有以下类
class Person {
    String name
}

class MortgageLender {
    def borrowAmount(amount) {
       "borrow \\$$amount"
    }
    def borrowFor(thing) {
       "buy \\$thing"
    }
}

def lender = new MortgageLender()

def delegator = new Delegator(Person, lender)我们现在可以使用委托者自动从出借者对象借用方法,以扩展Person类。我们可以按原样借用方法,或者重命名后借用
delegator.delegate 'borrowFor'
delegator.delegate 'borrowAmount', 'getMoney'

def p = new Person()

println p.borrowFor('present')   // => buy present
println p.getMoney(50)
上面第一行,通过委托给 lender 对象,将 borrowFor 方法添加到 Person 类。第二行,通过委托给 lender 对象的 borrowAmount 方法,将 getMoney 方法添加到 Person 类。
或者,我们可以像这样借用多个方法
delegator.delegateAll 'borrowFor', 'borrowAmount'这将这两个方法添加到 Person 类。
或者如果我们想要所有方法,就像这样
delegator.delegateAll()这将使委托对象中的所有方法在 Person 类中可用。
或者,我们可以使用映射表示法重命名多个方法
delegator.delegateAll borrowAmount:'getMoney', borrowFor:'getThing'1.8.2. 使用 @Delegate 注解实现委托模式
自版本 1.6 起,您可以使用基于 AST 转换的内置委托机制。
这使得委托变得更加容易
class Person {
    def name
    @Delegate MortgageLender mortgageLender = new MortgageLender()
}

class MortgageLender {
    def borrowAmount(amount) {
       "borrow \\$$amount"
    }
    def borrowFor(thing) {
       "buy $thing"
    }
}

def p = new Person()

assert "buy present" == p.borrowFor('present')
assert "borrow \\$50" == p.borrowAmount(50)
1.9. 享元模式
享元模式是一种大幅减少内存需求的模式,它通过不要求在处理包含许多大多相同的实体的系统时创建大量重量级对象来实现。例如,如果一个文档使用一个复杂的字符类建模,该字符类了解 unicode、字体、定位等,那么对于大型文档来说,如果文档中的每个物理字符都需要自己的字符类实例,则内存需求可能会非常大。相反,字符本身可以保存在字符串中,我们可能只有一个字符类(或少量,例如每种字体类型一个字符类)知道如何处理字符的细节。
在这种情况下,我们将与其他许多事物共享的状态(例如字符类型)称为固有状态。它被捕获在重量级类中。区分物理字符的状态(可能只是其 ASCII 码或 Unicode)称为其外在状态。
1.9.1. 示例
首先,我们将模拟一些复杂的飞机(第一个是第二个的恶作剧竞争对手 - 尽管这与示例无关)。
class Boeing797 {
    def wingspan = '80.8 m'
    def capacity = 1000
    def speed = '1046 km/h'
    def range = '14400 km'
    // ...
}
class Airbus380 {
    def wingspan = '79.8 m'
    def capacity = 555
    def speed = '912 km/h'
    def range = '10370 km'
    // ...
}
如果我们要模拟我们的机队,我们的第一次尝试可能涉及使用这些重量级对象的许多实例。然而,事实证明,对于每架飞机,只有少数几个小的状态(我们的外在状态)会发生变化,因此我们将为重量级对象使用单例,并单独捕获外在状态(下面的代码中为购买日期和资产编号)。
class FlyweightFactory {
    static instances = [797: new Boeing797(), 380: new Airbus380()]
}

class Aircraft {
    private type         // intrinsic state
    private assetNumber  // extrinsic state
    private bought       // extrinsic state
    Aircraft(typeCode, assetNumber, bought) {
        type = FlyweightFactory.instances[typeCode]
        this.assetNumber = assetNumber
        this.bought = bought
    }
    def describe() {
        println """
        Asset Number: $assetNumber
        Capacity: $type.capacity people
        Speed: $type.speed
        Range: $type.range
        Bought: $bought
        """
    }
}

def fleet = [
    new Aircraft(380, 1001, '10-May-2007'),
    new Aircraft(380, 1002, '10-Nov-2007'),
    new Aircraft(797, 1003, '10-May-2008'),
    new Aircraft(797, 1004, '10-Nov-2008')
]

fleet.each { p -> p.describe() }
因此,即使我们的机队包含数百架飞机,每种类型的飞机也只有一个重量级对象。
作为进一步的效率措施,我们可以使用享元对象的延迟创建,而不是像上面示例那样预先创建初始映射。
运行此脚本将产生
Asset Number: 1001
Capacity: 555 people
Speed: 912 km/h
Range: 10370 km
Bought: 10-May-2007

Asset Number: 1002
Capacity: 555 people
Speed: 912 km/h
Range: 10370 km
Bought: 10-Nov-2007

Asset Number: 1003
Capacity: 1000 people
Speed: 1046 km/h
Range: 14400 km
Bought: 10-May-2008

Asset Number: 1004
Capacity: 1000 people
Speed: 1046 km/h
Range: 14400 km
Bought: 10-Nov-2008
1.10. 迭代器模式
迭代器模式允许顺序访问聚合对象的元素,而无需暴露其底层表示。
Groovy 的许多闭包运算符(例如 each 和 eachWithIndex)以及 for .. in 循环都内置了迭代器模式。
例如
def printAll(container) {
    for (item in container) { println item }
}

def numbers = [ 1,2,3,4 ]
def months = [ Mar:31, Apr:30, May:31 ]
def colors = [ java.awt.Color.BLACK, java.awt.Color.WHITE ]
printAll numbers
printAll months
printAll colors
结果输出为
1
2
3
4
May=31
Mar=31
Apr=30
java.awt.Color[r=0,g=0,b=0]
java.awt.Color[r=255,g=255,b=255]
另一个例子
colors.eachWithIndex { item, pos ->
    println "Position $pos contains '$item'"
}
结果是
Position 0 contains 'java.awt.Color[r=0,g=0,b=0]'
Position 1 contains 'java.awt.Color[r=255,g=255,b=255]'
迭代器模式也内置在其他特殊运算符中,例如 eachByte、eachFile、eachDir、eachLine、eachObject、eachMatch 运算符,用于处理流、URL、文件、目录和正则表达式匹配。
1.11. 借用资源模式
借用资源模式确保资源一旦超出范围就会被确定性地处置。
这种模式内置在许多 Groovy 辅助方法中。如果您需要以 Groovy 不支持的方式处理资源,您应该考虑自己使用它。
1.11.1. 示例
考虑以下处理文件的代码。首先我们可以向文件中写入一些行,然后打印其大小
def f = new File('junk.txt')
f.withPrintWriter { pw ->
    pw.println(new Date())
    pw.println(this.class.name)
}
println f.size()
// => 42
我们还可以逐行读取文件内容并打印出每一行
f.eachLine { line ->
    println line
}
// =>
// Mon Jun 18 22:38:17 EST 2007
// RunPattern
请注意,Groovy 在底层使用了正常的 Java Reader 和 PrintWriter 对象,但代码编写者不必担心显式创建或关闭这些资源。内置的 Groovy 方法将各自的读取器或写入器借给闭包代码,然后自行清理。因此,您正在使用此模式,而无需执行任何工作。
然而,有时您希望以与 Groovy 内置机制免费获得的方式略有不同的方式做事。您应该考虑在自己的资源处理操作中利用此模式。
考虑如何处理文件中每一行的单词列表。我们也可以使用 Groovy 的内置函数来做到这一点,但请耐心等待,假设我们必须自己处理一些资源。以下是我们不使用此模式时可能编写的代码
def reader = f.newReader()
reader.splitEachLine(' ') { wordList ->
    println wordList
}
reader.close()
// =>
// [ "Mon", "Jun", "18", "22:38:17", "EST", "2007" ]
// [ "RunPattern" ]
请注意,现在我们的代码中有一个显式的 close() 调用。如果我们没有正确编码(这里我们没有将代码用 try … finally 块包围),我们就有可能留下文件句柄打开的风险。
现在,让我们应用借用模式。首先,我们将编写一个辅助方法
def withListOfWordsForEachLine(File f, Closure c) {
    def r = f.newReader()
    try {
        r.splitEachLine(' ', c)
    } finally {
        r?.close()
    }
}
现在,我们可以将代码重写如下
withListOfWordsForEachLine(f) { wordList ->
    println wordList
}
// =>
// [ "Mon", "Jun", "18", "22:38:17", "EST", "2007" ]
// [ "RunPattern" ]
这大大简化了,并删除了显式的 close()。现在它在一个地方得到了处理,因此我们可以在一个地方应用适当级别的测试或审查,以确保我们没有问题。
1.12. 使用幺半群
幺半群允许将聚合算法的机制与与该聚合相关的算法特定逻辑分离。它通常被认为是一种函数式设计模式。
也许,通过一个例子最容易看出。考虑整数求和、整数乘积和字符串连接的代码。我们可能会注意到各种相似之处
def nums = [1, 2, 3, 4]

def sum = 0    (1)
for (num in nums) { sum += num }    (2)
assert sum == 10

def product = 1    (1)
for (num in nums) { product *= num }    (2)
assert product == 24

def letters = ['a', 'b', 'c']

def concat = ''    (1)
for (letter in letters) { concat += letter }    (2)
assert concat == 'abc'| 1 | 初始化聚合计数器 |
| 2 | 使用 for/while/迭代循环元素,调整计数器 |
我们可以去除重复的聚合编码,并找出每个算法的重要差异。我们可以转而使用 Groovy 的 inject 方法。这是函数式编程术语中的一个折叠操作。
assert nums.inject(0){ total, next -> total + next } == 10
assert nums.inject(1){ total, next -> total * next } == 24
assert letters.inject(''){ total, next -> total + next } == 'abc'
这里,第一个参数是初始值,提供的闭包包含算法特定的逻辑。
同样,对于 Groovy 3+,我们可以使用 JDK 流 API 和 lambda 语法,如下所示
assert nums.stream().reduce(0, (total, next) -> total + next) == 10
assert nums.stream().reduce(1, (total, next) -> total * next) == 24
assert letters.stream().reduce('', (total, next) -> total + next) == 'abc'
1.12.1. 一点形式主义
看这些例子,我们可能会认为所有的聚合都可以用这种方式支持。事实上,我们寻找某些特征来确保这种聚合模式适用
-
闭包:执行聚合步骤应该产生与被聚合元素相同类型的结果。
|
这里使用“闭包”一词,我们只是指在操作下闭合,而不是 Groovy 的 |
-
结合律:我们应用聚合步骤的顺序不应影响结果。
-
单位元(有时也称为“零”元素):应该存在一个元素,它与任何元素聚合后返回原始元素。
如果你的算法不满足所有的幺半群性质,这并不意味着聚合是不可能的。这只是意味着你不会从幺半群中获得所有的好处,我们稍后会讲到,或者你可能需要做更多的工作。此外,你可能能够稍微转换你的数据结构,将你的问题变成一个涉及幺半群的问题。我们将在本节稍后介绍这个主题。
1.12.2. 幺半群的益处
考虑将整数 10 到 16 相加。因为整数加法操作是一个幺半群,我们已经知道我们可以节省编写代码,而是使用我们在早期 inject 示例中看到的方法。还有一些其他不错的属性。
由于闭包属性,如果我们有一个像 sum(Integer a, Integer b) 这样的成对方法,那么对于幺半群,我们总是可以将该方法扩展为与列表一起使用,例如 sum(List<Integer> nums) 或 sum(Integer first, Integer… rest)。
由于结合性,我们可以采用一些有趣的方法来解决聚合,包括
-
分治算法,将问题分解成更小的部分
-
各种增量算法,例如记忆化,如果之前已经计算过 1..4 的和,则允许从 1..5 开始求和,通过重用 1..4 的缓存值来开始
-
固有的并行化可以利用多核
让我们更详细地看一下第一个。使用多核处理器,一个核心可以添加 10 加 11,另一个核心 12 加 13,依此类推。如果需要,我们将使用单位元素(在我们的示例中显示为添加到 16)。然后,中间结果也可以并发地相加,依此类推,直到达到结果。

我们减少了需要编写的代码量,并且还获得了潜在的性能提升。
以下是我们如何使用 GPars 并发和并行框架编写前面示例的代码(显示了两种替代方案)
def nums = 10..16
GParsPool.withPool {
    assert 91 == nums.injectParallel(0){ total, next -> total + next }
    assert 91 == nums.parallel.reduce(0, (total, next) -> total + next)
}
1.12.3. 处理非幺半群
假设我们想找到数字 1..10 的平均值。Groovy 有一个内置方法可以做到这一点
assert (1..10).average() == 5.5现在,假设我们想构建自己的幺半群解决方案,而不是使用内置版本。找到单位元素可能看起来很困难。毕竟
assert (0..10).average() == 5同样,如果我们试图编写成对聚合闭包,它可能看起来像这样
def avg = { a, b -> (a + b) / 2 }这里我们可以用哪个 b 作为单位元,使得我们的等式返回原始值?我们需要使用 a,但那不是一个固定值,所以没有单位。
此外,对于这种最初尝试定义的 avg,结合律不成立,如下例所示
assert 6 == avg(avg(10, 2), 6)
assert 7 == avg(10, avg(2, 6))此外,我们的闭包属性如何?我们原来的数字是整数,但我们的平均值(5.5)不是。我们可以通过使我们的平均值适用于任何 Number 实例来解决这个问题,但这可能并非总是那么容易。
这个问题似乎不适合幺半群解决方案。然而,有许多方法可以将幺半群引入解决方案。
我们可以把它分成两部分
def nums = 1..10
def total = nums.sum()
def avg = total / nums.size()
assert avg == 5.5
sum() 的计算可以遵循幺半群规则,然后我们的最后一步可以计算平均值。我们甚至可以与 GPars 进行并发版本
withPool {
    assert 5.5 == nums.sumParallel() / nums.size()
}
在这里,我们使用的是内置的 sum() 方法(以及 GPars 示例中的 sumParallel()),但是如果您手动操作,计算的这一部分的幺半群性质将使其更容易编写自己的代码。
或者,我们可以引入一个辅助数据结构,将问题重新构造为幺半群。与其只保留总数,不如保留一个包含总数和数字计数的列表。代码可能看起来像这样
def holder = nums
    .collect{ [it, 1] }
    .inject{ a, b -> [a[0] + b[0], a[1] + b[1]] }
def avg = holder[0] / holder[1]
assert avg == 5.5
或者,更花哨一点,我们可以为我们的数据结构引入一个类,甚至可以并发计算
class AverageHolder {
    int total
    int count
    AverageHolder plus(AverageHolder other) {
        return new AverageHolder(total: total + other.total,
                                 count: count + other.count)
    }
    static final AverageHolder ZERO =
        new AverageHolder(total: 0, count: 0)
}

def asHolder = {
    it instanceof Integer ? new AverageHolder(total: it, count : 1) : it
}
def pairwiseAggregate = { aggregate, next ->
    asHolder(aggregate) + asHolder(next)
}
withPool {
    def holder = nums.injectParallel(AverageHolder.ZERO, pairwiseAggregate)
    def avg = holder.with{ total / count }
    assert avg == 5.5
}
1.13. 空对象模式
空对象模式涉及使用一个特殊的占位符对象来表示 null。通常,如果您有一个对 null 的引用,您就无法调用 reference.field 或 reference.method()。您会收到可怕的 NullPointerException。空对象模式使用一个特殊的表示 null 的对象,而不是使用实际的 null。这允许您在空对象上调用字段和方法引用。使用空对象的结果在语义上应等同于什么都不做。
1.13.1. 简单示例
假设我们有以下系统
class Job {
    def salary
}

class Person {
    def name
    def Job job
}

def people = [
    new Person(name: 'Tom', job: new Job(salary: 1000)),
    new Person(name: 'Dick', job: new Job(salary: 1200)),
]

def biggestSalary = people.collect { p -> p.job.salary }.max()
println biggestSalary
运行时,它会打印出 1200。现在假设我们调用
people << new Person(name: 'Harry')如果现在我们再次尝试计算 biggestSalary,我们会收到一个空指针异常。
为了克服这个问题,我们可以引入一个 NullJob 类,并将上面的语句更改为
class NullJob extends Job { def salary = 0 }

people << new Person(name: 'Harry', job: new NullJob())
biggestSalary = people.collect { p -> p.job.salary }.max()
println biggestSalary
这按我们的要求工作,但它并不总是使用 Groovy 实现此目的的最佳方式。Groovy 的安全解引用运算符(?.)和空感知闭包通常允许 Groovy 避免创建特殊空对象或空类的需要。这可以通过检查更 Groovy 的方式来编写上述示例来体现
people << new Person(name:'Harry')
biggestSalary = people.collect { p -> p.job?.salary }.max()
println biggestSalary这里有两件事正在发生,以使其工作。首先,max() 是“空感知”的,所以 [300, null, 400].max() == 400。其次,使用 ?. 运算符,像 p?.job?.salary 这样的表达式,如果 salary 为 null,或者如果 job 为 null,或者如果 p 为 null,则该表达式将等于 null。您无需编写复杂的嵌套 if ... then ... else 来避免 NullPointerException。
1.13.2. 树形示例
考虑以下示例,我们希望计算树结构中所有值的大小、累积和和累积乘积。
我们的第一次尝试在计算方法中包含特殊逻辑来处理空值。
class NullHandlingTree {
    def left, right, value

    def size() {
        1 + (left ? left.size() : 0) + (right ? right.size() : 0)
    }

    def sum() {
       value + (left ? left.sum() : 0) + (right ? right.sum() : 0)
    }

    def product() {
       value * (left ? left.product() : 1) * (right ? right.product() : 1)
    }
}

def root = new NullHandlingTree(
    value: 2,
    left: new NullHandlingTree(
        value: 3,
        right: new NullHandlingTree(value: 4),
        left: new NullHandlingTree(value: 5)
    )
)

println root.size()
println root.sum()
println root.product()
如果我们引入空对象模式(这里通过定义 NullTree 类),我们现在可以简化 size()、sum() 和 product() 方法中的逻辑。这些方法现在更清晰地表示正常(现在是通用)情况的逻辑。NullTree 中的每个方法都返回一个表示什么都不做的值。
class Tree {
    def left = new NullTree(), right = new NullTree(), value

    def size() {
        1 + left.size() + right.size()
    }

    def sum() {
       value + left.sum() + right.sum()
    }

    def product() {
       value * left.product() * right.product()
    }
}

class NullTree {
    def size() { 0 }
    def sum() { 0 }
    def product() { 1 }
}

def root = new Tree(
    value: 2,
    left: new Tree(
        value: 3,
        right: new Tree(value: 4),
        left: new Tree(value: 5)
    )
)

println root.size()
println root.sum()
println root.product()
运行这两个示例的结果是
4
14
120
注意:空对象模式的一个细微变体是将其与单例模式结合使用。因此,我们不会像上面那样在需要空对象的地方编写 new NullTree()。相反,我们将有一个单一的空对象实例,我们会在需要时将其放置在我们的数据结构中。
1.14. 观察者模式
观察者模式允许一个或多个观察者从主题对象那里接收有关更改或事件的通知。
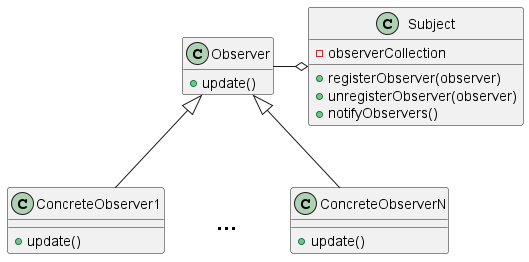
1.14.1. 示例
这是经典模式的典型实现
interface Observer {
    void update(message)
}

class Subject {
    private List observers = []
    void register(observer) {
        observers << observer
    }
    void unregister(observer) {
        observers -= observer
    }
    void notifyAll(message) {
        observers.each{ it.update(message) }
    }
}

class ConcreteObserver1 implements Observer {
    def messages = []
    void update(message) {
        messages << message
    }
}

class ConcreteObserver2 implements Observer {
    def messages = []
    void update(message) {
        messages << message.toUpperCase()
    }
}

def o1a = new ConcreteObserver1()
def o1b = new ConcreteObserver1()
def o2 = new ConcreteObserver2()
def observers = [o1a, o1b, o2]
new Subject().with {
    register(o1a)
    register(o2)
    notifyAll('one')
}
new Subject().with {
    register(o1b)
    register(o2)
    notifyAll('two')
}
def expected = [['one'], ['two'], ['ONE', 'TWO']]
assert observers*.messages == expected
使用闭包,我们可以避免创建具体的观察者类,如下所示
interface Observer {
    void update(message)
}

class Subject {
    private List observers = []
    void register(Observer observer) {
        observers << observer
    }
    void unregister(observer) {
        observers -= observer
    }
    void notifyAll(message) {
        observers.each{ it.update(message) }
    }
}

def messages1a = [], messages1b = [], messages2 = []
def o2 = { messages2 << it.toUpperCase() }
new Subject().with {
    register{ messages1a << it }
    register(o2)
    notifyAll('one')
}
new Subject().with {
    register{ messages1b << it }
    register(o2)
    notifyAll('two')
}
def expected = [['one'], ['two'], ['ONE', 'TWO']]
assert [messages1a, messages1b, messages2] == expected
作为 Groovy 3+ 的变体,让我们考虑放弃 Observer 接口并使用 lambdas,如下所示
import java.util.function.Consumer

class Subject {
    private List<Consumer> observers = []
    void register(Consumer observer) {
        observers << observer
    }
    void unregister(observer) {
        observers -= observer
    }
    void notifyAll(message) {
        observers.each{ it.accept(message) }
    }
}

def messages1a = [], messages1b = [], messages2 = []
def o2 = { messages2 << it.toUpperCase() }
new Subject().with {
    register(s -> messages1a << s)
    register(s -> messages2 << s.toUpperCase())
    notifyAll('one')
}
new Subject().with {
    register(s -> messages1b << s)
    register(s -> messages2 << s.toUpperCase())
    notifyAll('two')
}
def expected = [['one'], ['two'], ['ONE', 'TWO']]
assert [messages1a, messages1b, messages2] == expected
我们现在调用 Consumer 的 accept 方法,而不是 Observer 的 update 方法。
1.14.2. @Bindable 和 @Vetoable
JDK 包含一些遵循观察者模式的内置类。java.util.Observer 和 java.util.Observable 类从 JDK 9 开始因各种限制而被弃用。相反,建议您使用 java.beans 包中更强大的类,例如 java.beans.PropertyChangeListener。幸运的是,Groovy 有一些内置转换(groovy.beans.Bindable 和 groovy.beans.Vetoable),它们支持该包中的一些关键类。
import groovy.beans.*
import java.beans.*

class PersonBean {
    @Bindable String first
    @Bindable String last
    @Vetoable Integer age
}

def messages = [:].withDefault{[]}
new PersonBean().with {
    addPropertyChangeListener{ PropertyChangeEvent ev ->
        messages[ev.propertyName] << "prop: $ev.newValue"
    }
    addVetoableChangeListener{ PropertyChangeEvent ev ->
        def name = ev.propertyName
        if (name == 'age' && ev.newValue > 40)
            throw new PropertyVetoException()
        messages[name] << "veto: $ev.newValue"
    }
    first = 'John'
    age = 35
    last = 'Smith'
    first = 'Jane'
    age = 42
}

def expected = [
    first:['prop: John', 'prop: Jane'],
    age:['veto: 35'],
    last:['prop: Smith']
]
assert messages == expected
这里,像 addPropertyChangeListener 这样的方法与前面示例中的 registerObserver 扮演相同的角色。有一个 firePropertyChange 方法对应于前面示例中的 notifyAll/notifyObservers,但 Groovy 在这里会自动添加它,因此在源代码中不可见。还有一个 propertyChange 方法对应于前面示例中的 update 方法,尽管在这里也同样不可见。
1.15. 扩展库模式
扩展库模式提出了一种扩展库的方法,该库几乎满足您的所有需求,但还需要一点点补充。它假设您没有感兴趣库的源代码。
1.15.1. 示例
假设我们想利用 Groovy 内置的 Integer 功能(它建立在 Java 已有的功能之上)。这些库几乎拥有我们想要的所有功能,但并非全部。我们可能没有 Groovy 和 Java 库的所有源代码,所以我们无法直接更改库。相反,我们扩展了库。Groovy 有多种方法可以做到这一点。一种方法是使用 Category。
首先,我们将定义一个合适的类别。
class EnhancedInteger {
    static boolean greaterThanAll(Integer self, Object[] others) {
        greaterThanAll(self, others)
    }
    static boolean greaterThanAll(Integer self, others) {
        others.every { self > it }
    }
}
我们添加了两个方法,通过提供 greaterThanAll 方法来增强 Integer 方法。类别遵循约定,它们被定义为静态方法,其中包含一个特殊的第一个参数,表示我们希望扩展的类。greaterThanAll(Integer self, others) 静态方法变为 greaterThanAll(other) 实例方法。
我们定义了两个版本的 greaterThanAll。一个适用于集合、范围等。另一个适用于可变数量的 Integer 参数。
这是使用类别的方法。
use(EnhancedInteger) {
    assert 4.greaterThanAll(1, 2, 3)
    assert !5.greaterThanAll(2, 4, 6)
    assert 5.greaterThanAll(-4..4)
    assert 5.greaterThanAll([])
    assert !5.greaterThanAll([4, 5])
}
正如您所看到的,使用这种技术,您可以有效地丰富原始类,而无需访问其源代码。此外,您可以在系统的不同部分应用不同的增强功能,并在需要时处理未增强的对象。
1.16. 代理模式
代理模式允许一个对象充当另一个对象的假冒替代品。通常,使用代理的人并不知道他们没有使用真实的东西。当真实对象难以创建或使用时,该模式很有用:它可能存在于网络连接上,或者是一个内存中的大型对象,或者是一个文件、数据库或一些其他昂贵或无法复制的资源。
1.16.1. 示例
代理模式的一个常见用法是与不同 JVM 中的远程对象通信。这是用于创建通过套接字与服务器对象通信的代理的客户端代码,以及一个用法示例
class AccumulatorProxy {
    def accumulate(args) {
        def result
        def s = new Socket("localhost", 54321)
        s.withObjectStreams { ois, oos ->
            oos << args
            result = ois.readObject()
        }
        s.close()
        return result
    }
}

println new AccumulatorProxy().accumulate([1, 2, 3, 4, 5, 6, 7, 8, 9, 10])
// => 55
这是您的服务器代码可能的样子(首先启动此代码)
class Accumulator {
    def accumulate(args) {
        args.inject(0) { total, arg -> total += arg }
    }
}

def port = 54321
def accumulator = new Accumulator()
def server = new ServerSocket(port)
println "Starting server on port $port"
while(true) {
    server.accept() { socket ->
        socket.withObjectStreams { ois, oos ->
            def args = ois.readObject()
            oos << accumulator.accumulate(args)
        }
    }
}
1.17. 单例模式
单例模式用于确保某个特定类只创建一个对象。当需要一个对象来协调整个系统中的操作时,这会很有用;也许是为了效率,因为创建大量相同对象会造成浪费,也许是因为需要一个单一控制点的特定算法,或者当一个对象用于与不可共享资源交互时。
单例模式的缺点包括
-
它会降低重用性。例如,如果您想将继承与单例一起使用,就会出现问题。如果
SingletonB扩展了SingletonA,那么每个类是否应该只有(至多)一个实例,或者其中一个类的对象创建是否应该禁止另一个类的创建。此外,如果您决定两个类都可以有一个实例,那么如何覆盖静态的getInstance()方法? -
由于静态方法,单例通常也难以测试,但 Groovy 可以在需要时提供支持。
1.17.1. 示例:经典的 Java 单例
假设我们希望创建一个用于收集投票的类。由于获取正确的投票数量可能非常重要,我们决定使用单例模式。只会有一个 VoteCollector 对象,这使我们更容易推断该对象的创建和使用。
class VoteCollector {
    def votes = 0
    private static final INSTANCE = new VoteCollector()
    static getInstance() { return INSTANCE }
    private VoteCollector() { }
    def display() { println "Collector:${hashCode()}, Votes:$votes" }
}
此代码的兴趣点包括
-
它有一个私有构造函数,因此在我们的系统中无法创建
VoteCollector对象(除了我们创建的INSTANCE) -
INSTANCE也是私有的,因此一旦设置就无法更改 -
目前我们还没有使投票更新线程安全(它不会增加这个示例的复杂性)
-
投票收集器实例不是延迟创建的(如果我们从不引用该类,则不会创建实例;但是,一旦我们引用该类,即使最初不需要,也会创建实例)
我们可以在一些脚本代码中像这样使用这个单例类
def collector = VoteCollector.instance
collector.display()
collector.votes++
collector = null

Thread.start{
    def collector2 = VoteCollector.instance
    collector2.display()
    collector2.votes++
    collector2 = null
}.join()

def collector3 = VoteCollector.instance
collector3.display()
这里我们使用了实例 3 次。第二次使用甚至是在不同的线程中(但不要在新类加载器场景中尝试此操作)。
运行此脚本会产生(您的哈希码值会因环境而异)
Collector:15959960, Votes:0
Collector:15959960, Votes:1
Collector:15959960, Votes:2
该模式的变体
-
为了支持延迟加载和多线程,我们只需使用
synchronized关键字和getInstance()方法。这会带来性能损失,但会起作用。 -
我们可以考虑涉及双重检查锁定和
volatile关键字的变体,但请参阅此处对此方法的限制。
1.17.2. 示例:通过元编程实现单例
Groovy 的元编程能力允许以更基本的方式实现单例模式等概念。此示例说明了使用 Groovy 元编程能力实现单例模式的简单方法,但不一定是最高效的方法。
假设我们想要跟踪计算器执行的计算总数。一种方法是为计算器类使用单例,并在类中保留一个变量来存储计数。
首先,我们定义一些基类。一个执行计算并记录其执行了多少次计算的 Calculator 类,以及一个作为计算器门面的 Client 类。
class Calculator {
    private total = 0
    def add(a, b) { total++; a + b }
    def getTotalCalculations() { 'Total Calculations: ' + total }
    String toString() { 'Calc: ' + hashCode() }
}

class Client {
    def calc = new Calculator()
    def executeCalc(a, b) { calc.add(a, b) }
    String toString() { 'Client: ' + hashCode() }
}现在我们可以定义并注册一个MetaClass,它会拦截所有创建 Calculator 对象的尝试,并始终提供一个预先创建的实例。我们还将这个 MetaClass 注册到 Groovy 系统中
class CalculatorMetaClass extends MetaClassImpl {
    private static final INSTANCE = new Calculator()
    CalculatorMetaClass() { super(Calculator) }
    def invokeConstructor(Object[] arguments) { return INSTANCE }
}

def registry = GroovySystem.metaClassRegistry
registry.setMetaClass(Calculator, new CalculatorMetaClass())
现在我们在脚本中使用 Client 类的实例。客户端类将尝试创建新的计算器实例,但始终会获得单例。
def client = new Client()
assert 3 == client.executeCalc(1, 2)
println "$client, $client.calc, $client.calc.totalCalculations"

client = new Client()
assert 4 == client.executeCalc(2, 2)
println "$client, $client.calc, $client.calc.totalCalculations"
这是运行此脚本的结果(您的哈希码值可能不同)
Client: 7306473, Calc: 24230857, Total Calculations: 1
Client: 31436753, Calc: 24230857, Total Calculations: 2
1.17.3. Guice 示例
我们还可以使用 Guice 实现单例模式。
再次考虑计算器示例。
Guice 是一个面向 Java 的框架,支持面向接口的设计。因此,我们首先创建一个 Calculator 接口。然后我们可以创建 CalculatorImpl 实现和一个 Client 对象,脚本将与之交互。Client 类在此示例中并非严格必需,但它允许我们展示非单例实例是默认的。这是代码
@Grapes([@Grab('aopalliance:aopalliance:1.0'), @Grab('com.google.code.guice:guice:1.0')])
import com.google.inject.*

interface Calculator {
    def add(a, b)
}

class CalculatorImpl implements Calculator {
    private total = 0
    def add(a, b) { total++; a + b }
    def getTotalCalculations() { 'Total Calculations: ' + total }
    String toString() { 'Calc: ' + hashCode() }
}

class Client {
    @Inject Calculator calc
    def executeCalc(a, b) { calc.add(a, b) }
    String toString() { 'Client: ' + hashCode() }
}

def injector = Guice.createInjector (
    [configure: { binding ->
        binding.bind(Calculator)
               .to(CalculatorImpl)
               .asEagerSingleton() } ] as Module
)

def client = injector.getInstance(Client)
assert 3 == client.executeCalc(1, 2)
println "$client, $client.calc, $client.calc.totalCalculations"

client = injector.getInstance(Client)
assert 4 == client.executeCalc(2, 2)
println "$client, $client.calc, $client.calc.totalCalculations"
注意 Client 类中的 @Inject 注解。我们总是可以直接在源代码中知道哪些字段将被注入。
在这个例子中,我们选择使用显式绑定。我们所有的依赖项(好的,目前在这个例子中只有一个)都在绑定中配置。Guice 注入器知道绑定并在我们创建对象时根据需要注入依赖项。为了使单例模式成立,您必须始终使用 Guice 创建您的实例。到目前为止所示的任何内容都无法阻止您手动使用 new CalculatorImpl() 创建计算器的另一个实例,这当然会违反所需的单例行为。
在其他场景中(尽管可能不是大型系统),我们可以选择使用注解来表达依赖关系,如下例所示
@Grapes([@Grab('aopalliance:aopalliance:1.0'), @Grab('com.google.code.guice:guice:1.0')])
import com.google.inject.*

@ImplementedBy(CalculatorImpl)
interface Calculator {
    // as before ...
}

@Singleton
class CalculatorImpl implements Calculator {
    // as before ...
}

class Client {
    // as before ...
}

def injector = Guice.createInjector()

// ...
注意 CalculatorImpl 类上的 @Singleton 注解和 Calculator 接口中的 @ImplementedBy 注解。
运行时,上面的示例(使用任何一种方法)将产生(您的哈希码值将有所不同)
Client: 8897128, Calc: 17431955, Total Calculations: 1
Client: 21145613, Calc: 17431955, Total Calculations: 2
您可以看到,每当我们请求一个实例时,我们都会获得一个新的客户端对象,但它注入了相同的计算器对象。
1.17.4. Spring 示例
我们可以像这样再次使用 Spring 来实现计算器示例
@Grapes([@Grab('org.springframework:spring-core:5.2.8.RELEASE'), @Grab('org.springframework:spring-beans:5.2.8.RELEASE')])
import org.springframework.beans.factory.support.*

interface Calculator {
    def add(a, b)
}

class CalculatorImpl implements Calculator {
    private total = 0
    def add(a, b) { total++; a + b }
    def getTotalCalculations() { 'Total Calculations: ' + total }
    String toString() { 'Calc: ' + hashCode() }
}

class Client {
    Client(Calculator calc) { this.calc = calc }
    def calc
    def executeCalc(a, b) { calc.add(a, b) }
    String toString() { 'Client: ' + hashCode() }
}

// Here we 'wire' up our dependencies through the API. Alternatively,
// we could use XML-based configuration or the Grails Bean Builder DSL.
def factory = new DefaultListableBeanFactory()
factory.registerBeanDefinition('calc', new RootBeanDefinition(CalculatorImpl))
def beanDef = new RootBeanDefinition(Client, false)
beanDef.setAutowireMode(AbstractBeanDefinition.AUTOWIRE_AUTODETECT)
factory.registerBeanDefinition('client', beanDef)

def client = factory.getBean('client')
assert 3 == client.executeCalc(1, 2)
println "$client, $client.calc, $client.calc.totalCalculations"

client = factory.getBean('client')
assert 4 == client.executeCalc(2, 2)
println "$client, $client.calc, $client.calc.totalCalculations"
结果如下(您的哈希码值会有所不同)
Client: 29418586, Calc: 10580099, Total Calculations: 1
Client: 14800362, Calc: 10580099, Total Calculations: 2
1.18. 状态模式
状态模式提供了一种结构化方法,用于划分复杂系统中的行为。系统的整体行为被划分为定义明确的状态。通常,每个状态都由一个类实现。系统的整体行为可以首先通过了解系统的当前状态来确定;其次,通过理解在该状态下可能发生的行为(体现在对应于该状态的类的方法中)。
1.18.1. 示例
这是一个例子
class Client {
    def context = new Context()
    def connect() {
        context.state.connect()
    }
    def disconnect() {
        context.state.disconnect()
    }
    def send_message(message) {
        context.state.send_message(message)
    }
    def receive_message() {
        context.state.receive_message()
    }
}

class Context {
    def state = new Offline(this)
}

class ClientState {
    def context
    ClientState(context) {
        this.context = context
        inform()
    }
}

class Offline extends ClientState {
    Offline(context) {
        super(context)
    }
    def inform() {
        println "offline"
    }
    def connect() {
        context.state = new Online(context)
    }
    def disconnect() {
        println "error: not connected"
    }
    def send_message(message) {
        println "error: not connected"
    }
    def receive_message() {
        println "error: not connected"
    }
}

class Online extends ClientState {
    Online(context) {
        super(context)
    }
    def inform() {
        println "connected"
    }
    def connect() {
        println "error: already connected"
    }
    def disconnect() {
        context.state = new Offline(context)
    }
    def send_message(message) {
        println "\"$message\" sent"
    }
    def receive_message() {
        println "message received"
    }
}

client = new Client()
client.send_message("Hello")
client.connect()
client.send_message("Hello")
client.connect()
client.receive_message()
client.disconnect()
这是输出
offline
error: not connected
connected
"Hello" sent
error: already connected
message received
offline
然而,像 Groovy 这样的动态语言的一大优点是,我们可以根据特定的需求,以许多不同的方式表达这个示例。下面显示了此示例的一些潜在变体。
1.18.2. 变体 1:利用面向接口设计
我们可以采用的一种方法是利用面向接口设计。为此,我们可以引入以下接口
interface State {
    def connect()
    def disconnect()
    def send_message(message)
    def receive_message()
}
然后,我们的 Client、Online 和 Offline 类可以被修改以实现该接口,例如
class Client implements State {
  // ... as before ...
}

class Online implements State {
  // ... as before ...
}

class Offline implements State {
  // ... as before ...
}你可能会问:我们是不是只是引入了额外的样板代码?我们不能依赖鸭子类型吗?答案是“是”和“否”。我们可以摆脱鸭子类型,但状态模式的关键意图之一是划分复杂性。如果我知道客户端类和每个状态类都满足一个接口,那么我们就在复杂性周围设置了一些关键边界。我们可以单独查看任何状态类,并了解该状态可能发生的行为的范围。
我们不一定非要使用接口,但这有助于表达这种特定分区风格的意图,并且有助于减少单元测试的大小(在对接口设计支持较少的语言中,我们必须有额外的测试来表达这种意图)。
1.18.3. 变体 2:提取状态模式逻辑
另外,或与其他变体结合,我们可能会决定将一些状态模式逻辑提取到辅助类中。例如,我们可以在状态模式包/jar/脚本中定义以下类
abstract class InstanceProvider {
    static def registry = GroovySystem.metaClassRegistry
    static def create(objectClass, param) {
        registry.getMetaClass(objectClass).invokeConstructor([param] as Object[])
    }
}

abstract class Context {
    private context
    protected setContext(context) {
        this.context = context
    }
    def invokeMethod(String name, Object arg) {
        context.invokeMethod(name, arg)
    }
    def startFrom(initialState) {
        setContext(InstanceProvider.create(initialState, this))
    }
}

abstract class State {
    private client

    State(client) { this.client = client }

    def transitionTo(nextState) {
        client.setContext(InstanceProvider.create(nextState, client))
    }
}
这都是非常通用的,可以在任何我们想引入状态模式的地方使用。这是我们现在的代码的样子
class Client extends Context {
    Client() {
        startFrom(Offline)
    }
}

class Offline extends State {
    Offline(client) {
        super(client)
        println "offline"
    }
    def connect() {
        transitionTo(Online)
    }
    def disconnect() {
        println "error: not connected"
    }
    def send_message(message) {
        println "error: not connected"
    }
    def receive_message() {
        println "error: not connected"
    }
}

class Online extends State {
    Online(client) {
        super(client)
        println "connected"
    }
    def connect() {
        println "error: already connected"
    }
    def disconnect() {
        transitionTo(Offline)
    }
    def send_message(message) {
        println "\"$message\" sent"
    }
    def receive_message() {
        println "message received"
    }
}

client = new Client()
client.send_message("Hello")
client.connect()
client.send_message("Hello")
client.connect()
client.receive_message()
client.disconnect()
您可以看到,这里的 startFrom 和 transitionTo 方法开始使我们的示例代码具有 DSL 的感觉。
1.18.4. 变体 3:引入 DSL
或者,或与其他变体结合,我们可能会决定完全采用领域特定语言(DSL)方法来处理此示例。
我们可以定义以下通用辅助函数(首次讨论于 此处)
class Grammar {
    def fsm

    def event
    def fromState
    def toState

    Grammar(a_fsm) {
        fsm = a_fsm
    }

    def on(a_event) {
        event = a_event
        this
    }

    def on(a_event, a_transitioner) {
        on(a_event)
        a_transitioner.delegate = this
        a_transitioner.call()
        this
    }

    def from(a_fromState) {
        fromState = a_fromState
        this
    }

    def to(a_toState) {
        assert a_toState, "Invalid toState: $a_toState"
        toState = a_toState
        fsm.registerTransition(this)
        this
    }

    def isValid() {
        event && fromState && toState
    }

    public String toString() {
        "$event: $fromState=>$toState"
    }
}
class FiniteStateMachine {
def transitions = [:]
def initialState
def currentState
FiniteStateMachine(a_initialState) {
assert a_initialState, "You need to provide an initial state"
initialState = a_initialState
currentState = a_initialState
}
def record() {
Grammar.newInstance(this)
}
def reset() {
currentState = initialState
}
def isState(a_state) {
currentState == a_state
}
def registerTransition(a_grammar) {
assert a_grammar.isValid(), "Invalid transition ($a_grammar)"
def transition
def event = a_grammar.event
def fromState = a_grammar.fromState
def toState = a_grammar.toState
if (!transitions[event]) {
transitions[event] = [:]
}
transition = transitions[event]
assert !transition[fromState], "Duplicate fromState $fromState for transition $a_grammar"
transition[fromState] = toState
}
def fire(a_event) {
assert currentState, "Invalid current state '$currentState': passed into constructor"
assert transitions.containsKey(a_event), "Invalid event '$a_event', should be one of ${transitions.keySet()}"
def transition = transitions[a_event]
def nextState = transition[currentState]
assert nextState, "There is no transition from '$currentState' to any other state"
currentState = nextState
currentState
}
}现在我们可以这样定义和测试我们的状态机
class StatePatternDslTest extends GroovyTestCase {
    private fsm

    protected void setUp() {
        fsm = FiniteStateMachine.newInstance('offline')
        def recorder = fsm.record()
        recorder.on('connect').from('offline').to('online')
        recorder.on('disconnect').from('online').to('offline')
        recorder.on('send_message').from('online').to('online')
        recorder.on('receive_message').from('online').to('online')
    }

    void testInitialState() {
        assert fsm.isState('offline')
    }

    void testOfflineState() {
        shouldFail{
            fsm.fire('send_message')
        }
        shouldFail{
            fsm.fire('receive_message')
        }
        shouldFail{
            fsm.fire('disconnect')
        }
        assert 'online' == fsm.fire('connect')
    }

    void testOnlineState() {
        fsm.fire('connect')
        fsm.fire('send_message')
        fsm.fire('receive_message')
        shouldFail{
            fsm.fire('connect')
        }
        assert 'offline' == fsm.fire('disconnect')
    }
}
这个例子并非与其他例子完全等价。它不使用预定义的 Online 和 Offline 类。相反,它会根据需要即时定义整个状态机。有关这种风格更详细的示例,请参阅前面的参考。
1.19. 策略模式
策略模式允许您将特定算法从其使用中抽象出来。这使您可以轻松地交换正在使用的算法,而无需更改调用代码。该模式的一般形式是
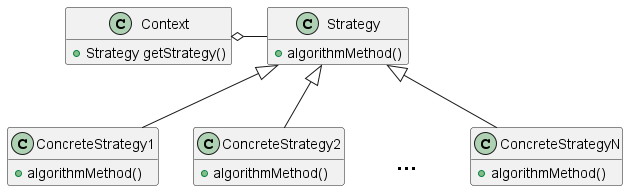
在 Groovy 中,由于它能够使用匿名方法(我们松散地称之为闭包)将代码视为第一类对象,因此对策略模式的需求大大减少了。您只需将算法放在闭包中即可。
1.19.1. 使用传统类层次结构的示例
首先让我们看看封装策略模式的传统方式。
interface Calc {
    def execute(n, m)
}

class CalcByMult implements Calc {
    def execute(n, m) { n * m }
}

class CalcByManyAdds implements Calc {
    def execute(n, m) {
        def result = 0
        n.times{
            result += m
        }

        result
    }
}

def sampleData = [
    [3, 4, 12],
    [5, -5, -25]
]

Calc[] multiplicationStrategies = [
    new CalcByMult(),
    new CalcByManyAdds()
]

sampleData.each{ data ->
    multiplicationStrategies.each { calc ->
        assert data[2] == calc.execute(data[0], data[1])
    }
}
这里我们定义了一个接口 Calc,我们的具体策略类将实现它(我们也可以使用抽象类)。然后我们定义了两种简单的乘法算法:CalcByMult 是常规方法,而 CalcByManyAdds 仅使用加法(不要尝试使用负数 - 是的,我们可以修复它,但这只会使示例更长)。然后我们使用正常的多态性来调用算法。
1.19.2. 使用闭包的示例
这是使用闭包实现相同目的的 Groovy 方式
def multiplicationStrategies = [
    { n, m -> n * m },
    { n, m -> def result = 0; n.times{ result += m }; result }
]

def sampleData = [
    [3, 4, 12],
    [5, -5, -25]
]

sampleData.each{ data ->
    multiplicationStrategies.each { calc ->
        assert data[2] == calc(data[0], data[1])
    }
}
1.19.3. 使用 Lambda 表达式的示例
对于 Groovy 3+,我们可以利用 lambda 语法
interface Calc {
    def execute(n, m)
}

List<Calc> multiplicationStrategies = [
    (n, m) -> n * m,
    (n, m) -> { def result = 0; n.times{ result += m }; result }
]

def sampleData = [
    [3, 4, 12],
    [5, -5, -25]
]

sampleData.each{ data ->
    multiplicationStrategies.each { calc ->
        assert data[2] == calc(data[0], data[1])
    }
}
或者我们可以使用内置的 JDK BiFunction 类
import java.util.function.BiFunction

List<BiFunction<Integer, Integer, Integer>> multiplicationStrategies = [
    (n, m) -> n * m,
    (n, m) -> { def result = 0; n.times{ result += m }; result }
]

def sampleData = [
    [3, 4, 12],
    [5, -5, -25]
]

sampleData.each{ data ->
    multiplicationStrategies.each { calc ->
        assert data[2] == calc(data[0], data[1])
    }
}
1.20. 模板方法模式
模板方法模式抽象出几个算法的细节。算法的通用部分包含在基类中。具体的实现细节则捕获在子类中。所涉及类的通用模式如下所示
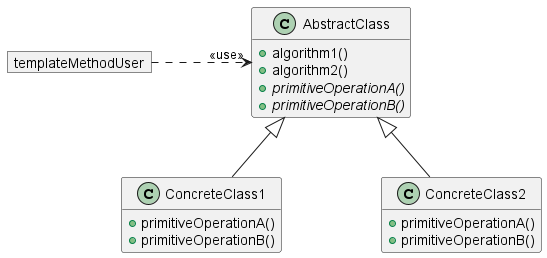
1.20.1. 使用传统类的示例
在这个例子中,基类 Accumulator 捕获了累积算法的精髓。子类 Sum 和 Product 提供了使用通用累积算法的特定定制方式。
abstract class Accumulator {
    protected initial
    abstract doAccumulate(total, v)
    def accumulate(values) {
        def total = initial
        values.each { v -> total = doAccumulate(total, v) }
        total
    }
}

class Sum extends Accumulator {
    def Sum() { initial = 0 }
    def doAccumulate(total, v) { total + v }
}

class Product extends Accumulator {
    def Product() { initial = 1 }
    def doAccumulate(total, v) { total * v }
}

assert 10 == new Sum().accumulate([1,2,3,4])
assert 24 == new Product().accumulate([1,2,3,4])
1.20.2. 使用简化策略的示例
在这种特殊情况下,您可以使用 Groovy 的 inject 方法,使用闭包达到类似的效果
Closure addAll = { total, item -> total += item }
def accumulated = [1, 2, 3, 4].inject(0, addAll)
assert accumulated == 10
由于鸭子类型,这也可以与支持 add(Groovy 中为 plus())方法的其他对象一起使用,例如
accumulated = [ "1", "2", "3", "4" ].inject("", addAll)
assert accumulated == "1234"
我们也可以将乘法情况写成如下(重写为一行代码)
assert 24 == [1, 2, 3, 4].inject(1) { total, item -> total *= item }以这种方式使用闭包看起来像策略模式,但如果我们意识到 Groovy 的 inject 方法是我们的模板方法的通用部分,那么闭包就成为模板方法模式的定制部分。
对于 Groovy 3+,我们可以使用 lambda 语法作为闭包语法的替代
assert 10 == [1, 2, 3, 4].stream().reduce(0, (l, r) -> l + r)
assert 24 == [1, 2, 3, 4].stream().reduce(1, (l, r) -> l * r)
assert '1234' == ['1', '2', '3', '4'].stream().reduce('', (l, r) -> l + r)
这里,流 API 的 reduce 方法是我们模板算法的通用部分,而 lambdas 则是模板方法模式的定制部分。
1.21. 访问者模式
访问者模式是那些众所周知但并不经常使用的模式之一。也许这是因为它一开始看起来有点复杂。但一旦您熟悉它,它就成为一种强大的方式来演进您的代码,而且正如我们将看到的,Groovy 提供了减少某些复杂性的方法,因此没有理由不考虑使用此模式。
该模式的目标是将算法与对象结构分离。这种分离的实际结果是能够在不修改现有对象结构的情况下向其添加新操作。
1.21.1. 简单示例
此示例探讨了如何计算形状(或形状集合)的边界。我们的首次尝试使用了传统的访问者模式。我们稍后将看到一种更 Groovy 的实现方式。
abstract class Shape { }

@ToString(includeNames=true)
class Rectangle extends Shape {
    def x, y, w, h

    Rectangle(x, y, w, h) {
        this.x = x; this.y = y; this.w = w; this.h = h
    }

    def union(rect) {
        if (!rect) return this
        def minx = [rect.x, x].min()
        def maxx = [rect.x + rect.w, x + w].max()
        def miny = [rect.y, y].min()
        def maxy = [rect.y + rect.h, y + h].max()
        new Rectangle(minx, miny, maxx - minx, maxy - miny)
    }

    def accept(visitor) {
        visitor.visit_rectangle(this)
    }
}

class Line extends Shape {
    def x1, y1, x2, y2

    Line(x1, y1, x2, y2) {
        this.x1 = x1; this.y1 = y1; this.x2 = x2; this.y2 = y2
    }

    def accept(visitor){
        visitor.visit_line(this)
    }
}

class Group extends Shape {
    def shapes = []
    def add(shape) { shapes += shape }
    def remove(shape) { shapes -= shape }
    def accept(visitor) {
        visitor.visit_group(this)
    }
}

class BoundingRectangleVisitor {
    def bounds

    def visit_rectangle(rectangle) {
        if (bounds)
            bounds = bounds.union(rectangle)
        else
            bounds = rectangle
    }

    def visit_line(line) {
        def line_bounds = new Rectangle([line.x1, line.x2].min(),
                                        [line.y1, line.y2].min(),
                                        line.x2 - line.y1,
                                        line.x2 - line.y2)
        if (bounds)
            bounds = bounds.union(line_bounds)
        else
            bounds = line_bounds
    }

    def visit_group(group) {
        group.shapes.each { shape -> shape.accept(this) }
    }
}

def group = new Group()
group.add(new Rectangle(100, 40, 10, 5))
group.add(new Rectangle(100, 70, 10, 5))
group.add(new Line(90, 30, 60, 5))
def visitor = new BoundingRectangleVisitor()
group.accept(visitor)
bounding_box = visitor.bounds
assert bounding_box.toString() == 'Rectangle(x:60, y:5, w:50, h:70)'
这需要相当多的代码,但现在的想法是,我们可以通过添加新的访问者来添加更多算法,而我们的形状类保持不变,例如,我们可以添加一个总面积访问者或一个碰撞检测访问者。
通过利用 Groovy 闭包,我们可以提高代码的清晰度(并将其缩小到大约一半的大小),如下所示:
abstract class Shape {
    def accept(Closure yield) { yield(this) }
}

@ToString(includeNames=true)
class Rectangle extends Shape {
    def x, y, w, h
    def bounds() { this }
    def union(rect) {
        if (!rect) return this
        def minx = [ rect.x, x ].min()
        def maxx = [ rect.x + rect.w, x + w ].max()
        def miny = [ rect.y, y ].min()
        def maxy = [ rect.y + rect.h, y + h ].max()
        new Rectangle(x:minx, y:miny, w:maxx - minx, h:maxy - miny)
    }
}

class Line extends Shape {
    def x1, y1, x2, y2
    def bounds() {
        new Rectangle(x:[x1, x2].min(), y:[y1, y2].min(),
                      w:(x2 - x1).abs(), h:(y2 - y1).abs())
    }
}

class Group {
    def shapes = []
    def leftShift(shape) { shapes += shape }
    def accept(Closure yield) { shapes.each{it.accept(yield)} }
}

def group = new Group()
group << new Rectangle(x:100, y:40, w:10, h:5)
group << new Rectangle(x:100, y:70, w:10, h:5)
group << new Line(x1:90, y1:30, x2:60, y2:5)
def bounds
group.accept{ bounds = it.bounds().union(bounds) }
assert bounds.toString() == 'Rectangle(x:60, y:5, w:50, h:70)'
或者,使用 Lambda 表达式,如下所示:
abstract class Shape {
    def accept(Function<Shape, Shape> yield) { yield.apply(this) }
}

@ToString(includeNames=true)
class Rectangle extends Shape {
    /* ... same as with Closures ... */
}

class Line extends Shape {
    /* ... same as with Closures ... */
}

class Group {
    def shapes = []
    def leftShift(shape) { shapes += shape }
    def accept(Function<Shape, Shape> yield) {
        shapes.stream().forEach(s -> s.accept(yield))
    }
}

def group = new Group()
group << new Rectangle(x:100, y:40, w:10, h:5)
group << new Rectangle(x:100, y:70, w:10, h:5)
group << new Line(x1:90, y1:30, x2:60, y2:5)
def bounds
group.accept(s -> { bounds = s.bounds().union(bounds) })
assert bounds.toString() == 'Rectangle(x:60, y:5, w:50, h:70)'
1.21.2. 高级示例
让我们考虑另一个例子来说明这种模式的更多要点。
interface Visitor {
    void visit(NodeType1 n1)
    void visit(NodeType2 n2)
}

interface Visitable {
    void accept(Visitor visitor)
}

class NodeType1 implements Visitable {
    Visitable[] children = new Visitable[0]
    void accept(Visitor visitor) {
        visitor.visit(this)
        for(int i = 0; i < children.length; ++i) {
            children[i].accept(visitor)
        }
    }
}

class NodeType2 implements Visitable {
    Visitable[] children = new Visitable[0]
    void accept(Visitor visitor) {
        visitor.visit(this)
        for(int i = 0; i < children.length; ++i) {
            children[i].accept(visitor)
        }
    }
}

class NodeType1Counter implements Visitor {
    int count = 0
    void visit(NodeType1 n1) {
        count++
    }
    void visit(NodeType2 n2){}
}
如果我们现在在一个这样的树上使用 NodeType1Counter
NodeType1 root = new NodeType1()
root.children = new Visitable[]{new NodeType1(), new NodeType2()}

def counter = new NodeType1Counter()
root.accept(counter)
assert counter.count == 2
那么我们有一个 NodeType1 对象作为根,其中一个子节点也是一个 NodeType1 实例。另一个子节点是 NodeType2 实例。这意味着在这里使用 NodeType1Counter 应该计数 2 个 NodeType1 对象,正如最后一条语句所验证的那样。
何时使用
此示例说明了访问者模式的一些优点。例如,虽然我们的访问者有状态(NodeType1 对象的计数),但对象树本身没有改变。同样,如果我们想要一个计数所有节点类型的访问者,或者一个计数使用了多少种不同类型的访问者,或者一个使用节点类型特有的方法收集信息的访问者,同样,只需要编写访问者本身即可。
如果我们添加新类型会发生什么?
在这种情况下,我们可能需要做很多工作。我们可能必须更改 Visitor 接口以接受新类型,并根据该接口的更改来更改潜在的大多数现有访问者,而且我们必须编写新类型本身。一个更好的方法是编写访问者的默认实现,所有具体的访问者都将扩展该实现。我们稍后将看到这种方法的使用。
如果我们想要不同的迭代模式怎么办?
那你就遇到麻烦了。由于节点描述了如何迭代,你无法在某个点影响并停止迭代或改变顺序。所以也许我们应该稍微改变一下,变成这样:
interface Visitor {
    void visit(NodeType1 n1)
    void visit(NodeType2 n2)
}

class DefaultVisitor implements Visitor{
    void visit(NodeType1 n1) {
        for(int i = 0; i < n1.children.length; ++i) {
            n1.children[i].accept(this)
        }
    }
    void visit(NodeType2 n2) {
        for(int i = 0; i < n2.children.length; ++i) {
            n2.children[i].accept(this)
        }
    }
}

interface Visitable {
    void accept(Visitor visitor)
}

class NodeType1 implements Visitable {
    Visitable[] children = new Visitable[0]
    void accept(Visitor visitor) {
        visitor.visit(this)
    }
}

class NodeType2 implements Visitable {
    Visitable[] children = new Visitable[0];
    void accept(Visitor visitor) {
        visitor.visit(this)
    }
}

class NodeType1Counter extends DefaultVisitor {
    int count = 0
    void visit(NodeType1 n1) {
        count++
        super.visit(n1)
    }
}
一些小的改变却带来了巨大的影响。现在访问者是递归的,并告诉我如何迭代。节点中的实现被最小化为 visitor.visit(this),DefaultVisitor 现在能够捕获新类型,我们可以通过不委托给父类来停止迭代。当然,现在最大的缺点是它不再是迭代的,但你无法获得所有好处。
使其 Groovy 化
现在的问题是如何使其更 Groovy 化。你有没有觉得 visitor.visit(this) 很奇怪?它为什么在那里?答案是为了模拟双重分派。在 Java 中,使用的是编译时类型,所以对于 visitor.visit(children[i]),编译器将无法找到正确的方法,因为 Visitor 不包含 visit(Visitable) 方法。即使它包含,我们也希望使用 NodeType1 或 NodeType2 访问更特殊的方法。
现在 Groovy 不使用静态类型,Groovy 使用运行时类型。这意味着我们可以毫无问题地使用 visitor.visit(children[i])。由于我们已将 accept 方法最小化到只执行双重分派部分,并且由于 Groovy 的运行时类型系统已经涵盖了这一点,我们还需要 accept 方法吗?实际上不需要,但我们可以做得更多。我们有一个缺点,那就是不知道如何处理未知的树元素。我们必须为此扩展接口 Visitor,导致 DefaultVisitor 发生变化,然后我们有任务提供一个有用的默认值,例如迭代节点或什么都不做。现在使用 Groovy,我们可以通过添加一个什么都不做的 visit(Visitable) 方法来捕获这种情况。顺便说一下,这在 Java 中也是一样的。
但我们不要止步于此。我们需要 Visitor 接口吗?如果我们没有 accept 方法,那么我们根本不需要 Visitor 接口。所以新代码将是
class DefaultVisitor {
    void visit(NodeType1 n1) {
        n1.children.each { visit(it) }
    }
    void visit(NodeType2 n2) {
        n2.children.each { visit(it) }
    }
    void visit(Visitable v) { }
}

interface Visitable { }

class NodeType1 implements Visitable {
    Visitable[] children = []
}

class NodeType2 implements Visitable {
    Visitable[] children = []
}

class NodeType1Counter extends DefaultVisitor {
    int count = 0
    void visit(NodeType1 n1) {
        count++
        super.visit(n1)
    }
}看起来我们在这里省了几行代码,但我们做得更多。Visitable 节点现在不引用任何 Visitor 类或接口。这大约是您在这里可能期望的最好的分离级别,但我们可以走得更远。让我们稍微改变一下 Visitable 接口,让它返回我们接下来要访问的子节点。这允许我们有一个通用的迭代方法。
class DefaultVisitor {
    void visit(Visitable v) {
        doIteration(v)
    }
    void doIteration(Visitable v) {
        v.children.each {
            visit(it)
        }
    }
}

interface Visitable {
    Visitable[] getChildren()
}

class NodeType1 implements Visitable {
    Visitable[] children = []
}

class NodeType2 implements Visitable {
    Visitable[] children = []
}

class NodeType1Counter extends DefaultVisitor {
    int count = 0
    void visit(NodeType1 n1) {
        count++
        super.visit(n1)
    }
}
DefaultVisitor 现在看起来有点不同。它有一个 doIteration 方法,该方法将获取它应该迭代的子节点,然后对每个元素调用 visit。默认情况下,这将调用 visit(Visitable),然后该方法将迭代此子节点的子节点。Visitable 也已更改,以确保任何节点都能够返回子节点(即使为空)。我们不必更改 NodeType1 和 NodeType2 类,因为 children 字段的定义方式已经使它们成为属性,这意味着 Groovy 非常好心地为我们生成了一个 get 方法。现在真正有趣的部分是 NodeType1Counter,它之所以有趣是因为我们没有更改它。super.visit(n1) 现在将调用 visit(Visitable),它将调用 doIteration,后者将启动下一级迭代。所以没有变化。但是 visit(it) 将调用 visit(NodeType1),如果它的类型是 NodeType1。实际上,我们不需要 doIteration 方法,我们也可以在 visit(Visitable) 中执行此操作,但此变体有一些好处。它允许我们编写一个新 Visitor,该 Visitor 覆盖 visit(Visitable) 以处理错误情况,这当然意味着我们不能执行 super.visit(n1),而是执行 doIteration(n1)。
总结
最终,我们获得了约 40% 的代码减少,一个健壮且稳定的架构,并且我们完全从 Visitable 中移除了 Visitor。要在 Java 中实现相同的效果,您可能需要诉诸反射。
访问者模式有时被描述为不适合极限编程技术,因为您需要一直对许多类进行更改。通过我们的设计,如果我们添加新类型,我们不需要更改任何东西。因此,该模式在使用 Groovy 时非常适合敏捷方法。
访问者模式有各种变体,例如非循环访问者模式,它们试图解决添加具有特殊访问者的新节点类型的问题。这些访问者的实现有它们自己的代码异味,例如使用类型转换、过度使用 instanceof 和其他技巧。更重要的是,这些方法试图解决的问题在 Groovy 版本中不会发生。我们建议避免使用此模式的该变体。
最后,如果还不明显,NodeType1Counter 也可以在 Java 中实现。Groovy 会识别访问方法并根据需要调用它们,因为 DefaultVisitor 仍然是 Groovy 并执行所有魔法。
2. 参考文献
-
Erich Gamma, Richard Helm, Ralph Johnson, John Vlissides (1995). 设计模式:可复用面向对象软件的元素。Addison-Wesley。ISBN 0-201-63361-2。
-
设计模式的规范参考。
-
-
Martin Fowler (1999). 重构:改善既有代码的设计。Addison-Wesley。ISBN 0-201-48567-2。
-
Joshua Kerievsky (2004). 重构到模式。Addison-Wesley。ISBN 0-321-21335-1。
-
Eric Freeman, Elisabeth Freeman, Kathy Sierra, Bert Bates (2004). 深入浅出设计模式。O’Reilly。ISBN 0-596-00712-4。*一本值得一读的好书,既有信息量又有趣。
-
Dierk Koenig 与 Andrew Glover, Paul King, Guillaume Laforge 和 Jon Skeet (2007)。Groovy in Action。Manning。ISBN 1-932394-84-2。
-
讨论了访问者、构建器和其他模式。
-
-
Brad Appleton (1999)。披萨倒置——一种高效资源消耗的模式。
-
许多软件工程师最常用的模式之一!
-
-
Neil Ford 的动态语言中的设计模式。动态语言中的设计模式。